

Hi friends!
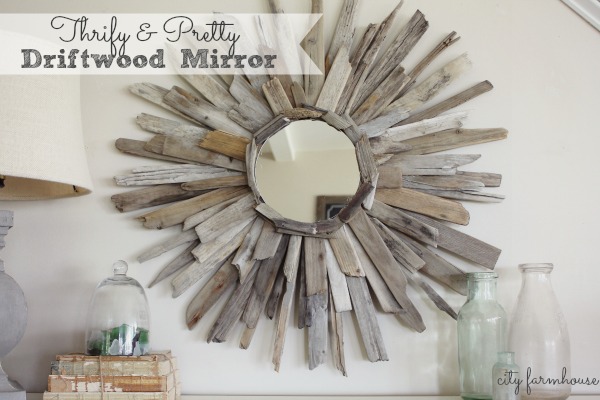
Thank you so much for all of the lovely, kind & sweet comments about my family room.
I really let my heart led the way with this space, as silly as that sounds.
I challenged myself to take some risks and to think outside the box.
And I am so glad I did.
Taking risks isn’t always an easy thing because sometimes,
it doesn’t work out how you had planned.
BUT then there are other times it comes out so much better
&
it is those times that make the creative journey worth the while.
For a while I had my eye on a few rustic farmhouse style coffee tables,
but with my SUPER small budget it just wasn’t an option.
I bought this Hemnes Coffee Table from IKEA a few months ago,
I just loved the size, simplicity, shape & price {of course}.
I knew I would alter it in some way but…..
we had the hurricane, then Thanksgiving, then Christmas.
I kept sitting in the room, trying to decide WHAT to do with it.
Then I thought,
“it shouldn’t be this hard.”
So one day last week, I decided to just paint it in ASCP-French Linen.
Do you ever have those days where
you just can’t seem to get it right?
I guess it seemed to my 7 year old that I was just a little stuck.
He said, “mom, you know it took
Thomas Edison over 2,000 times before he got the light bulb right.”
Phew, I needed that reality check:).
I decided to let it go for a few days.
Until…… the “light bulb” went off,
a barnboard table top!
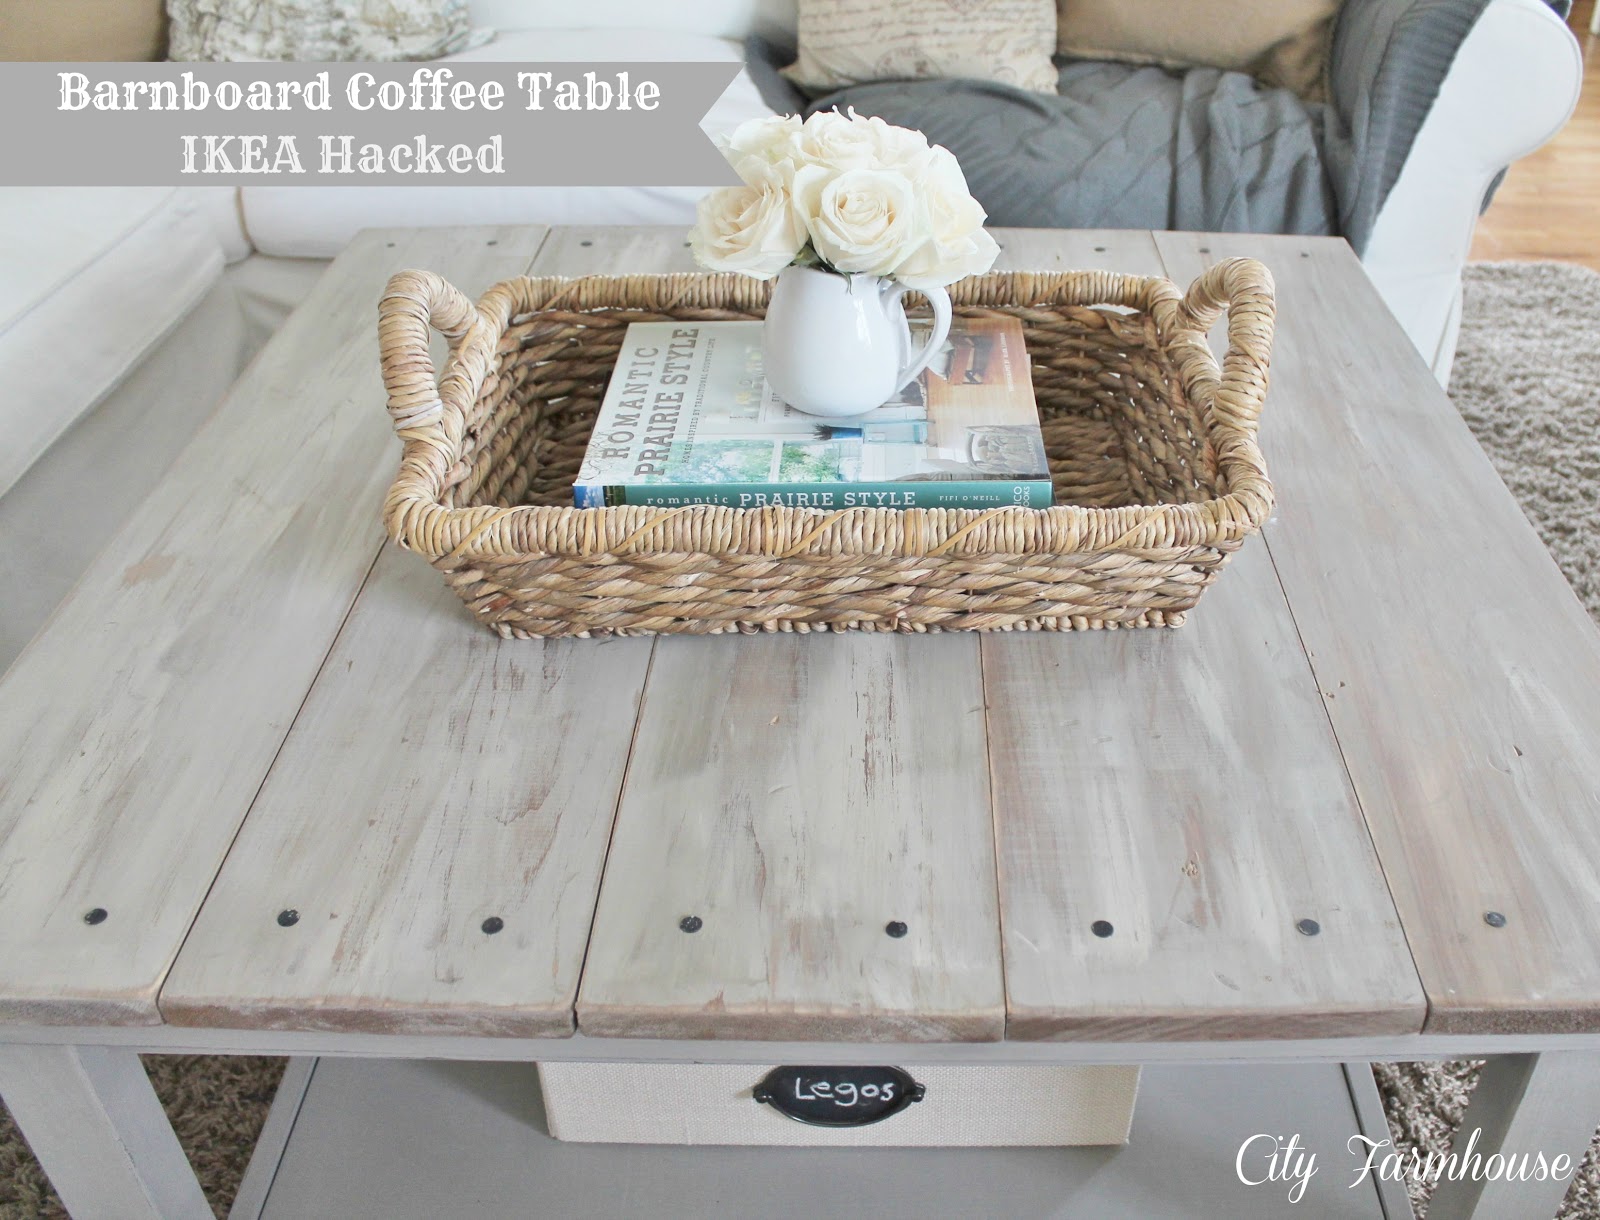
This was the table before the hacking:).


After painting the base in ASCP French Linen,
I sanded lightly with my sander to give a gently worn look.
Ok, so here is the fun part, the barnboard top:).
Keeping in mind the table top was 35.5″ x 35.5″,
I had my 5 -1″(d) x 8″(H)(really 7.25″) boards cut to exactly 36″(L).
And a piece of 35″ x 35″ MDF for the subfloor for under the planks.
Step 1-Sand & Stain


Sand out your rough edges before you begin.
Use some metal tools to distress certain areas more,
I gave it some good hits with
a crow bar & hammer,
large chains are good too.
You want to make it feel aged, battered & distressed so it looks authentic.
Aging Stain
In a glass jar(with lid) place 1 big ball of very fine steel wool,
then add vinegar, I filled 3/4 way.
Let sit for a few days sealed tight until the steel wool is dissolved.
Use gloves when applying with foam brush.
It will darken as it dries.
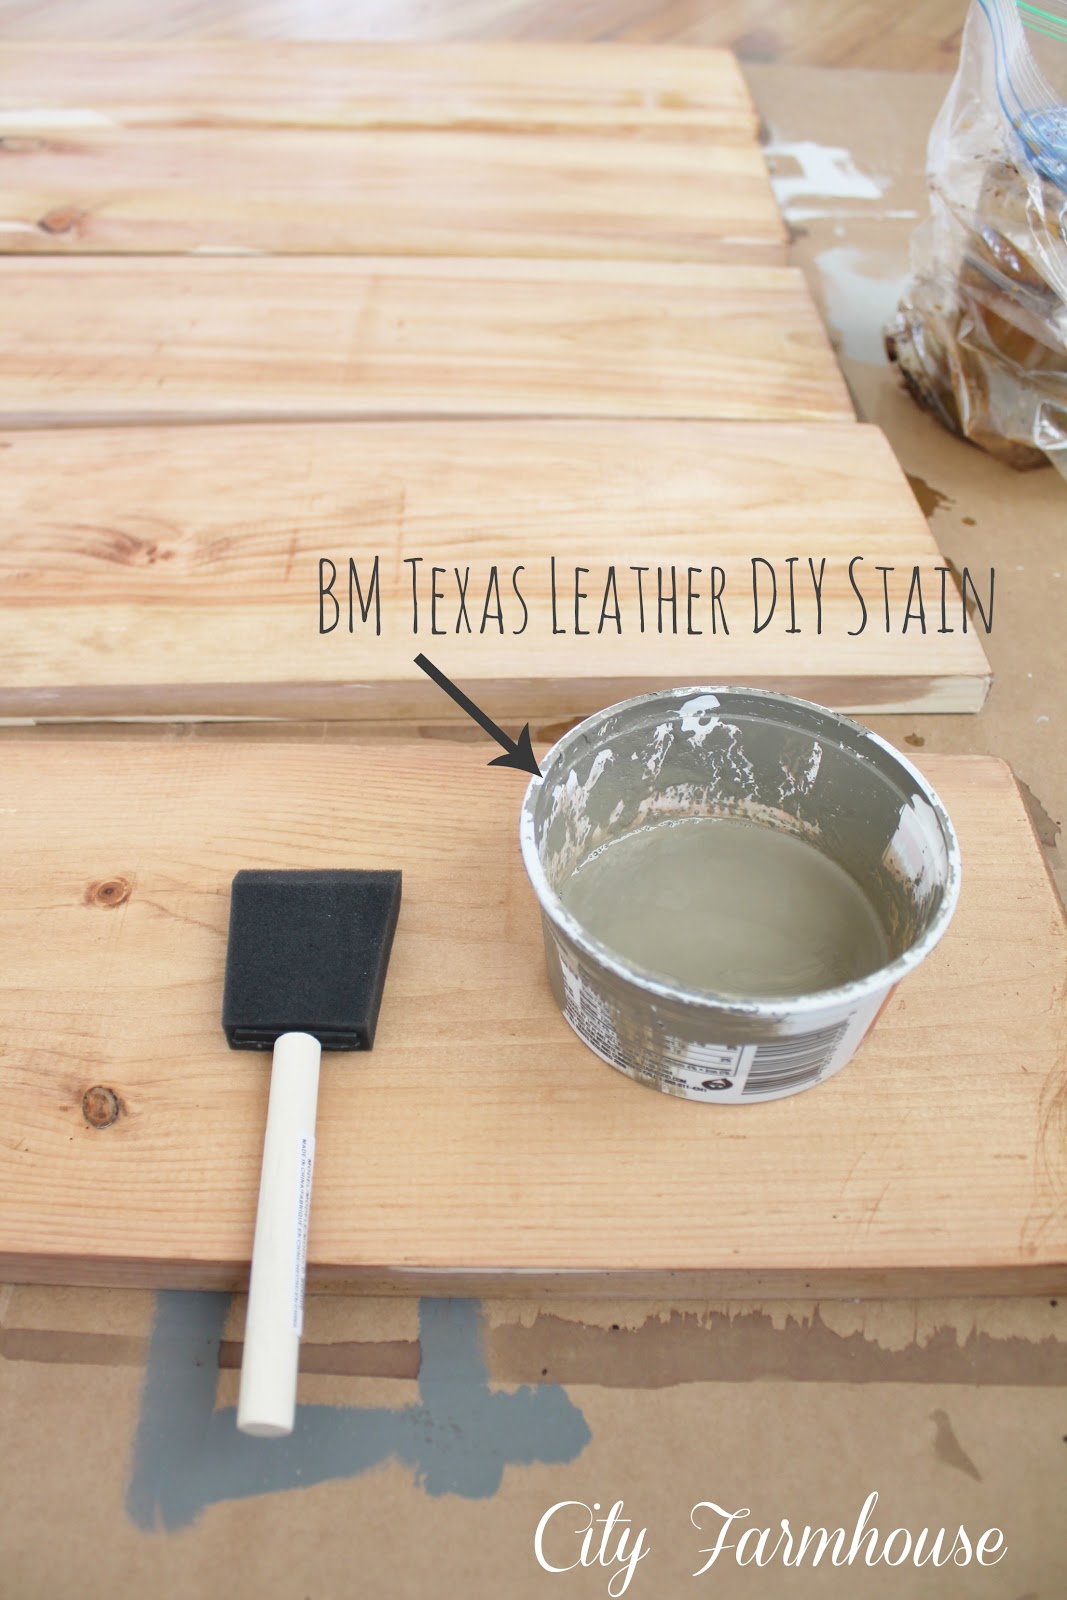
Step 2- Gray the wood

After the steel wool stain dried, I applied a layer of BM Texas Leather.
Disclosure: This post may contain affiliate links. As an Amazon Associate, I earn from qualifying purchases at no additional cost to you. See full Disclosure Statement HERE.
Texas Leather is a Benjamin Moore latex paint.
A sample with be more than enough for this project.
I mixed with water in a container, enough to make it a milky consistency.
Step 3- Another layer of gray

Next I used French Linen, you can use any light to medium shade of gray.
Again I made a stain by adding a little water.
Step 4- Last, lighter layer of gray

I made a stain from Benjamin Moore Revere Pewter.
Make sure you hit the wood with the different layers of stain, unevenly.
You want it to look weathered.
Step 5- Sand & Distress
Let dry & sand each plank good, use a hand sander with a fine grit or a sanding block.
This will give it a naturally aged look.
Sand unevenly for more depth.
Step 6- Subfloor & Planks

I wanted it to be more stable & removable so I took my planks & lined them up under the
35″ x 35″ square piece of MDF.
Step 7- Pre-drill & screw together

I drilled & screwed a line up left, right & middle,
3 all together in each plank.

Step 8- Nailheads

I wasn’t able to find black roofing nails so I sprayed them with
black chalkpaint.
A good tip for this is, find a shoe box top and puncture them through top and spray just tops.
I did 2 on each plank at the end, 20 all together,
you can see my very technical template above:).
Be sure to pre-drill first.
9. Secure to Table
Lay your planked top on floor facing down.
Flip table over to lay on top your planked top and pre-drill 5 holes,
one in each corner & 1 in the middle.
Screw base to top.


You can wax the top for more protection.
I used Anne Sloan’s Clear Wax.

It shouldn’t look perfect.
{That is what I love the most}


I am over the moon!
This is my favorite project by far, it really was so easy.
Don’t be afraid to ask Lowes or Home Depot to cut your wood,
just be sure to give them exact measurements.
Email me if you have any other questions.
Enjoy the rest of your week,


LOVE LOVE LOVE! I had already pinned a pic of your coffee table in your family room post because I loved the look so much!! Great tutorial, def keeping this one saved for future reference. Also love the tip about the shoebox top.. clever! It came out great, and I love AS french linen! One of my all time fav’s. ~Bre
Awesome & I can’t believe you did the project that quickly. The color is just great and I have been wanting to try that steel wool/vinegar for a while now. I love the wood cutting service at Home Depot and just used it over the weekend. It really makes projects more attainable.
Angela
LOVE this…it’s so beautiful! I just had my husband make our first piece of furniture for our home and I don’t love the stain…at all. This information is so helpful. I am going to have him try to sand the stain off (not sure if it’s possible) and try this. Definitely having him make this coffee table next. Thanks for the tutorial.
Jen,
This is so beautiful. You’ve done a wonderful job!
hugs
Sissie
I can see why it’s your favorite project…I love it! Love ASCP French Linen!
WheRe can you find French Linen paint?
It is Anne Sloan Chalk Paint, just google distributors & they can ship it to you. Hope that helps, Jen
Corinna Home Depot sells her paint line now! That’s where I went to make my own barn board table! 🙂
Missblondeambition.com
https://www.youtube.com/c/Missblondeambition?gvnc=1
It looks amazing! I love the stain color you used on the wood! I have used the vinegar/steel wool stain on a bunch of projects this year and it has never turned the wood gray unfortunately.
Very simple but what a change! Nice reuse job. So much better than the original, Bravo!
What a lovely idea! I love how the wood planks look and it adds a rustic look to this ikea table. Great job!
Such a great Ikea hack! It looks great!
Fabulous looking table. Glad this is where your final decision led you . Laura @Top This Top That
This is amazing…I love it! You really know your painting techniques! And do you work quickly!! Well done!
XO,
Jane
Charming upgrade to the table. It looks so great!
What a great job! So impressed with you and your blog…Happy to be following along now.
melinda
Loving your blog! Just found you on good ol’ Pinterest. Can’t wait to browse the blog some more tonight after the kiddo’s go to bed.
Jen
athomeinthenorthwestblog.com
This is beautiful Jen! What a difference it makes! Your whole room came together so wonderfully!
Simple yet beautiful! You’ve got an awesome color choice and painting techniques! Thanks for sharing this great project!
I Love this DIY. I already pinned it and now I have to definitely try this. Thank you so much for sharing!
-Rosy
http://www.ajoyfulkindoflife.blogspot.com
oh wow, this turned out great!!! love the muted gray colors!
Great makeover–I love it!
Thank you for the detailed tut. for this table. I absolutely love it! You did an amazing job creating something beautiful and unique for your home. I love furniture like this, that is pretty but you are not afraid to live with. Thank you for sharing your talents!
Thank you for the detailed tut. for this table. I absolutely love it! You did an amazing job creating something beautiful and unique for your home. I love furniture like this, that is pretty but you are not afraid to live with. Thank you for sharing your talents!
This is fantastic! Thanks for the tutorial. I am going to use it to revamp my much hated dining table which is much too formal for my lifestyle. Thanks!
The table is beautiful! I am in love with it – so simple and so pretty. Thanks for sharing your steps (and colors) that you used to weather the wood. I’m pinning this one so I won’t forget!
This comment has been removed by the author.
Love, love….ummmm….did I mention that I love it! What an amazing project! Totally pinning!
Thank you so much for inspiring me today!
blessings,
karianne
This is such a great tutorial and it would be perfect fix if your coffee table has a damaged top. Love it!
Great idea! You did an amazing job! Looks fabulous and rustic. I’m a new follower!
Hugs,
Monica.
I’m having a definite lightbulb moment! This is fabulous – worth all the tries and effort!
Pinning and sharing this bit of genius!
Can’t wait to see you tomorrow!
Kelly
I am a professional food photographer so was interested in your project to use as “fake” old farm table surfaces under my food photographs.
But the problem is that REAL barn wood has weathered – the rain and sun have removed the softer parts of the wood leaving the harder areas behind. This means with real wood one has high and low areas of the wood. Whereas your wood is totally flat, nicely stained, but flat.
What I finally did was to keep my eyes open when someone is having their wood fence repaired due to insect damage or breakage or other reasons. Then I salvage sections of the old fencing that I can use. This wood has three dimensional surfaces that will look interesing when photographed. Right now I have three salvaged fence sections out in my back yard resting against the chain link fence getting more aged over the winter.
Then this spring when the wood has dried out I will cut out the best parts into four foot sections (so they will fit in the back seat of my car to take to locations such as restaurants or food processing facilities). After cutting, I will rub them with stainless steel kitchen scrubbers, not steel wool. Then lightly sand and finally wax. I want to wax the boards to try to make them appear as though they have been a farm kitchen table for many generations so they have some “character” when the client’s food is sitting on the fake table.
Thank you for some useful ideas on staining and finishing.
Terry Thomas
Food Photographer
Atlanta, Georgia USA
What a beautiful transformation! The table looks just gorgeous!
Your table turned out fabulous. Love the color, love the barnboard and the nail heads. So pretty!
Thanks for sharing,
Suzanne
I love this table hack! Absolutely gorgeous! I think it’s great that you created your own great look!
Leslie
House on the Way
Your house could be mine! I have this exact table and for different reasons had been meaning to either cover it in pallet wood, or do what you did or even simply paint it.. my daughter told me to leave it grey as a resting place for the eyes, with all the light walls, soon curtains and white slip covered couches about… but still I dream of a table in a color other than grey…. I just might have to do this as our next project! When I share on my blog I will for sure give you credit!
Gorgeous! What a great idea! It turned out perfect.Love ASCP the French Linen is such a pretty shade.
Kimberlee
What a great project and I love the table!! Thanks for the tutorial in great detail…newbie like me needs that!
Hugs,
Pendra
It’s gorgeous, Jen! I love the barn boards on top… and so glad to hear that I’m not the only one that paints coat after coat. 🙂 It’s a perfect reflection of your style… love it!
I’ve just discover you blog and am your newest follower.Can’t wait to have a good look around!
Cheers! Rita
I love your wood distressing process- it payed off! Lovely 🙂
I’m in LOVE!! It’s stunning 🙂
GREAT hack!!! I love the addition of the wood planks!
xo,
Shannon
That’s really fabulous … the boards look amazing!
Really great. I’m not worried about the flatness I don’t think anyone is going to be checking. It looks beautiful and you used four of my Dave colors! Including white!
Fab job!
Really great. I’m not worried about the flatness I don’t think anyone is going to be checking. It looks beautiful and you used four of my Dave colors! Including white!
Fab job!
This is gorgeous! Quick question…how did you attach the subfloor to the existing table? Or is it just sitting on top?
Thanks!
That looks great!! What a transformation! Thanks for showing exactly how you achieved the look.
This comment has been removed by the author.
First, congrats on a very cool feature! I would have been super geeky too for sure when I found out. I ADORE this project. Combining modern, clean lines and rustic wood can be so fun, you nailed it girl!
xo, Tanya
This is a fabulous idea! I think I want to barnboard everything now!
Found this through the Ikea Hacks blog. This is an amazing improvement to the original table. I probably would have passed up the original table not seeing this end vision. I really love it!!
I love this! Which table did you use? Thanks
I LOVE THIS!!! I am stealing this idea for my coffee table. I found you on West Furniture Revival!
Helen
What an amazing transformation!
My daughter has the same table and it is in a dark stain from Ikea.
I’m linking this and sending it her way.
Plan on doing basically the same thing on a table I purchased for $5. I live at the beach so the top planks will be a mix of gray, turquoise and whatever else looks good!
Love this! I am in the process of doing something similar and found a post that talks about wood needing to have enough tannins in the wood to react with the steel wood/vinegar solution. Assuming that was why yours didn’t work (and why my test run with cheap whitewood planks didn’t work either!). The blogger recommended brushing them with strong brewed black tea first, letting it dry, then using the vinegar solution. Just thought I would share. But I actually think I like your faux finish better! 🙂
Thank you Ellen, great tip, I will definitely try:).
I absolutely love this and really want to do it myself! Forgive me, but I’m just a bit confused on what colors you used – for the table itself and for the wood top. Also, does bm=Benjamin Moore?? What does MDF stand for? And the BM Texas leather, is that the vinegar stain you made?? Thank you again and thank you for sharing!!!
I love it! I happened to have the exact same coffee table from IKEA! I must do this!!
Really love this! So simple and so beautiful. Modern Farmhouse. Very cool
Your table is lovely and just the perfect color! Can I ask what kind of Benjamin Moore paint you recommend… Satin? Eggshell? Flat? Thank you!
As a big fan of IKEA products – loved this great idea for make one of their products your own! Great job! Big fan of your blog.
Hi Stephen, your comment made my day! Thank you so much for taking the time to write it:). For the record I am a HUGE fan of yours!!! Have a fantastic weekend! Jen
Lovely! There is an easy trick to get the vinegar/steel wool vinegar solution to gray the wood. Steep Earl Grey Tea and brush the raw wood with it first. Let it try then the vinegar/steel wool will instantly gray the wood 🙂 You can see the effect on my table at http://www.smilesofgrace.org/give-thanks/ Great work!
This is by far the best tutorial I’ve found for antiqued/rustic/aged wood. I really appreciate you sharing the stain technique and the vinegar secret solution! Thank you so much! I used it to do my own coffee table and dining room table and I love it!
Nice job Jen! I have used the steel wool and vinegar a lot, but have never combined it with all the paint in the way you did…looks great!
Thank you Jackie!
Hi, I absolutely love this design!! Would you be able to estimate how much this project ended up costing in materials, etc? I’d really love to make this for our new home but I’d also love to know what I’m in for first haha. Thanks so much!
So beautiful. I am always at a loss as to how peoe get such depth of color in their stain. Now I know. Thanks!!!! 🙂
Gorgeous! I have a question for you – my coffee table has some weird scalloped edges. Do you think this technique would work without have even edges on the table?
this is freakin PERFECT!!! we are in the process of buying a house and for the longest time I’ve been trying to think of our table . wayyyyy before we started house hunting . this is it! love love lovvvee!!!!
I’m the same way with projects , sometimes i just have to walk away .
Could you please tell me what brand of paint the “French Linen” is please (fr Canada) . I don’t recognize ASCP. Thanks
Hello,you did a very very great Job with this lovely Table; iam very timeless and i want to ask you,if you can build me such a lovely great Table!
There are too many steps to built this and i have always to work hard,so i had no Time to built!
Greetings and Love from Germany!
LOVE LOVE LOVE it!!!
Please,can you sell me such a wonderful Table?
LOVE LOVE LOVE it!!!
I too, do not recognize the brand name for the French Linen paint ( fr Canada) could you kindly let us know what ASCP stands for? Thanks
I LOVE this and I really want to try it, but how did you paint the IKEA table? Doesn’t it have a laminate finish on it?
It is a wood finish so I just used Anne Sloans Chalk Paint. It has held up great:).
I love this! Do you think this would work on the Ikea Hemnes table in the black/brown colour? What do you think I would need to do differently?
I hope so because I have this exact table in the black/brown color and I was wondering what to do with it (was in son’s room and need to repurpose in our media room) when I saw this post come up and voila! It was exactly how I pictured it looking!! If you paint it with the Anne Sloans chalk paint it shouldn’t matter what the initial color was. Although I haven’t used ASCP before, I have heard amazing things about it!
Have ya’ll tried it yet or got a response? I bought it today and realized I bought the wrong color, and now have the black/brown table as well. I would rather not go back to IKEA to return it if it comes out just as hers did with the gray/brown base. Please let me know, thanks!!
Hi Jennifer, that color will be fine, you are painting it so no worries. Good Luck!!! Jen
Wow, this is stunning!! I absolutely LOVE it!!! I’ve been looking at various whitewashing techniques and I love the technique you used!! Thank you so much for sharing!!
Love your table!! I am buying tomorrow a rectangular Ikea table and I think I will do something similar to yours. Maybe I’ll need to ask for some help…
Hey! This may have already been answered, i didn’t read through all these comments 😉 but! I have been looking to do something IDENTICAL to this, and I’m so happy I came across your page. However, I have the same table in black…do you think those paint colors would still work :/ ? or do you have any other suggestions?
Hi Krista, if you are painting the base then yes they will still work. Good Luck! YOU will love it, still love mine! Have a great holiday weekend! Jen
I’m always the last one to the party 🙁 I love this and it seems easy enough. I’m a newbie DIYer and I recently re-did my dining room table and i love it.. so far. haven’t quite finished. I’m wondering, would it be possible to skip the MDF and go right for the planks on the table. I recently scored this table second hand for 20$ and i can’t wait to redo it. Thanks for sharing!
Hi! I plan on doing this, but with my dining room table. I’m confused about how to secure it on. You say pre drilled holes, but is that in the mdf or the ikea table itself? Could you explain to how to secure it on like I’m clueless (because I am, haha)?
Hi Helena, I am sorry, if you are doing a table and want the option of reusing as is without a ton of holes from the planks then use mdf as a base and yes, predrill into that so it doesn’t split. If you think you will never need to use the table again as it is then you don’t need the mdf, you can skip that part. I only did it so that I could use the table again without the wood top. I hope this help! Good Luck!!! Jen
Hi Jen,
So I think I got everything I needed at home depot yesterday. Just a little confused about the nails. I bought 1.25″ screws so they would go through both pieces of wood and the coffee table base. Did you end up using both nails and screws? Also did you sand the base of the table before painting it?
I love this!! So pretty. Thank you for sharing! This is probably a silly question and I’m sure I could find something similar somewhere, but where exactly did you get your basket and teapot type white vase on the table? Thank you!
Hi Erin, thank you! All found at Target years ago:). Have a good week, Jen
Amazing project, the result is stunning !
LOVE this!! I have been looking for a while couch and loved the color combination with the table. Did you just put on white couch covers?